How to Upload Images to Cricut Design Space?
If you are ready to upload your images to Cricut Design Space, I’m assuming you are a new Cricut owner! Welcome to the club! Making crafts and projects with the Cricut Explore Air 2 is so much fun and the possibilities are endless!
The ready-made projects that Design Space offers could help you create an entire house full of clever crafts and beautiful home décor. But as we all know, there’s so much more that you can do with Design Space beyond what it comes with pre-loaded. Know that the upload process is the same for both the Maker and the Cricut Explorer.
Uploading your own images into Design Space is one of the greatest and most flexible of its features, and the reason that so many crafty moms like myself truly love this machine.
If you are new to Design Space, I have created the ultimate guide to learning Design Space, you have to check it out!
Don't forget to become a member of the FREE printable and Cricut Cut File Library!
How To Upload an Image to Cricut Design Space

Step 1: Begin by clicking the “New Project” plus sign found on the bottom left-hand corner of your screen. You can also select the “New Project” green button at the top right – they do the same thing.

Step 2: A gridded design space or “mat” will pop up. This is the main design mat onto which you upload files, and where you can move around, re-size, flip, re-shape, add text, or do whatever else you can imagine to your fun and unique designs.

Step 3: See the “Upload” icon here at the bottom left-hand corner of your screen? This is where we’re going to start uploading our own images – click it to proceed.
Step 4: You’ve got two options at this point: you can either search your computer for the file that you want to upload, or you can drag a file onto the gray mat area and it will automatically upload.

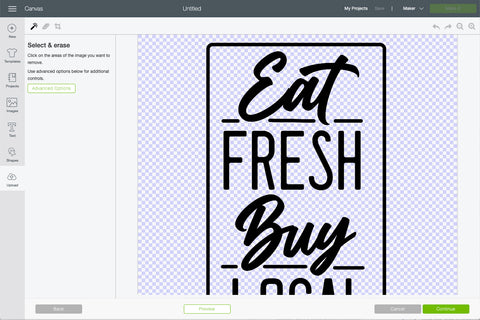
Step 5: For our purposes today, I’m going to be working with this cute Eat Fresh Buy Local image. I uploaded the image as a .png file and chose “simple:” you can choose from either “simple,” “moderately complex” or “complex” depending on the level of detail you require for your image. For my purposes I really don’t need a highly complex image, so “simple” is just fine.

Step 6: You’ve selected “simple:” now Cricut Design Space will pull your image into the mat area, and it usually pulls the image in at quite a large size. This is okay! It will help you see if there’s anything about your design you want to edit. If there is nothing to erase and you like the design as is, you can click “Continue” to proceed.
Step 7: Here’s where things get really fun. In the left-hand box on your screen, you can choose to save your image as a print: you would then print out your image and cut it later. OR, in the right-hand box you can choose to cut this shape with your Cricut (if what you want is a cut of the shape, not just a print of the image).

Step 8: If there’s any editing you want to do to your image before you print or cut, however, this is the place to do it. Options along the left-hand side of your screen and in the tool bar at the top let you alter and shape your image in any number of fun ways: it’s up to you to explore all that’s possible within Design Space.

Step 9: Start creating!
This is what’s great about Design Space: you get the opportunity here to truly be creative and explore so many possibilities in terms of what can be printed and cut. Now you know how to upload any image to Design Space with ease and work with it on your mat area as you see fit.
PRO TIP: The easiest images to use are SVGs. These are files that are curated specifically to cut. PNG is the next best because they typically have a transparent background. JPGs will need the background removed for cutting, these are better for print and cut projects.
Have fun, be creative, and let your crafty flag fly as you invent and imagine with Design Space and your Cricut Explore Air 2 or Cricut Maker!
More Cricut Tutorials and Cut Files:
-
What Materials Can a Cricut Cut?
-
FREE Resource Library
- What Tools Do I Need To Start Crafting with My Cricut?
- Get The Eat Fresh Buy Local Image Here
SVGs You Will Love:
Pin for Later!

Leave a comment